Making Scales 110

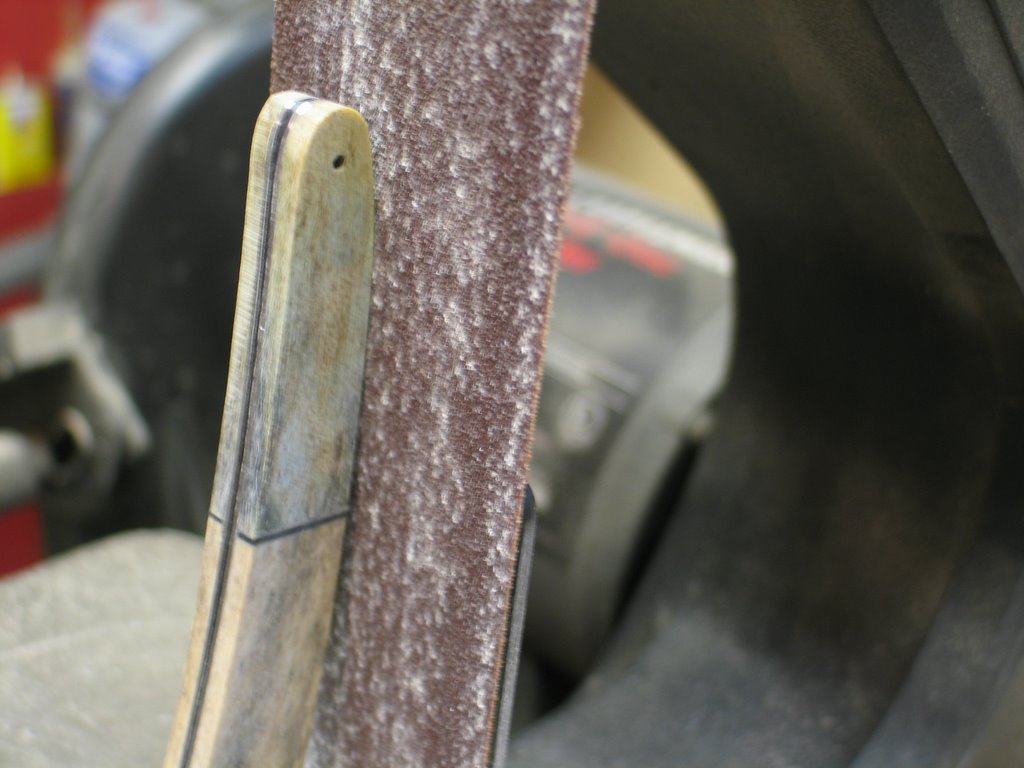
Back to the sanding process... Sand the profile of the "single" scale, using all the work spots of the sanding belt as defined in the last section.
Don't forget that you can use the leading as well as the trailing edge of the sanding belt to remove everything that doesn't look like a set of scales. Go slow, especially with the rougher grits of sandpaper... remember, you can't put the material back once it is gone.
I did not have the machine running for the photos. Didn't want any mishaps. Notice how the gentle curve of the back can be easily sanded by turning it vertically.
Before going to a finer grit paper, make sure you are completely done with the scales with the current grit. Then, progressively work your way to finer and finer grits. This is a good progression:
- 80 grit
- 220 grit
- 400 grit
- 600 grit

Much of my work is done freehand and by "eyeball" You can get pretty good at it with a little practice.
Do be careful when sanding your scales as illustrated on the left photo. That sanding belt has no respect whatsoever for your fingers and knuckles.
It is about here that you will actually see why I said it was important to line the scales up at the dividing line of the materials. Lookin' good, eh?
I'm going to throw in a photo of another set of scales I was working on to illustrate how I use the upper contact wheel to finish the inside curves.
 This area of the wheel is indespensible for all of the inside curves and edge bevels.
Once all of the profile is finished, you are practically done. It is time to address the edges of the profile.
I slope mine a tad like the gentle roofline of a toolshed, not just round them. It allows me to dome the sides to give a well rounded and pleasing contour.
You can also leave the edges relatively sharp and striking. Here is where you play around to develop your own style.
My knives are like that. When I was really active with them, people knew I made a specific knife simply because of the style. Most good knifemakers develop this attribute.
I use the sanding belts to round all of my edges, but I don't even go near them until I am down to 400 grit. Otherwise, you will remove too much material. Practice with a curved piece of wood before working on a set of scales with liners. Practice being the key word.
After doing what you can with the machines, do the rest with files, rotary tools, and sandpaper. Have some patience... you will get down to this...

Buff the "single" scale out. Once that is done, take a utility razor knife and carefully separate the two halves.
Use your thumb to roll the rubber cement on the insides of the scales into a huge booger. You can toss it in the trash can or play with it for a while like you did as a kid. Sand the insides lightly.
Seal the inside edges with thin superglue. Try not to get any on the outside of your new scales or glue your fingers to them like I did. Sand lightly with 1,000 grit paper. Take the burr off the inside edges of the scales with the same grit paper. Put renaissance wax over the whole kit and caboodle. Renaissance wax is expensive, but you will only need one jar and it works really great for scales and blades.
Here we are! Wall Ah! Or, if you prefer... violã. This concludes Making Scales 101. Next will be putting them on a blade. I guess that would be called Pinning Scales 101.

Addendum: Drill the holes except the one at the heel or butt all the way through on the one scale. Once that is done, put that scale on top of the other one. Make sure the two halves are lined up perfectly as they were before you separated them. Take it to the drill press and run the bit slightly through the holes you just made just to provide the starting point for drilling on the inside of the other scale. Separate them and finish drilling the holes, being very careful as the drill bit breaks through the material of the scales so they don't chip out. There should only be 3 holes drilled for now.
If you are interested in the pinning lessons, I need to know. Now is the time to make comments, not only for what I have already written, but for encouragement for me to continue. I need more than 5 or 10 of you to say something to put it here on this blog. No interest here and I'll just put it in the update on my CD.
Hope you have learned something. Send me pics of your projects...
posted by Bill at 10:28 AM
![]()
![]()


16 Comments:
Let's see some pin work!!
Chris
Nice set of scales, and writing style, too;)
Won't the superglue on the inside be too brittle and chip away with use? Isn't some elastic paint better choice?
pinnig would be nice addition to this blog...
N
N...
I am not familiar with elastic paint. Maybe someone could clue me in?
Bill,
Personally I’m looking forward to the update of your CD, It’s always a pleasure to read your material. It’s obvious that you have devoted a considerable amount of time to putting together these blogs. Your efforts are much appreciated, bring on the Pinning Blog..
John
ahem.. I was talking just regular paint :) I just tought that any metal paint would be less brittle than hardened superglue... My bad if I'm mistaking.
N
Bill, ofcourse we want you to continue this blog, making it great reference and educational read for all of us, straight razor nuts...
spf, SRP.com
Please show us how to to the pin work
Yes, I need pinning lessons. I just picked up a Griffon that I am restoring for my buddy. The scales are in fine shape, but the blade has rust in the pivot area. I need to take out the old pivot pin, remove the scales, buff out the corrosion, and pin the scales back on. I have no clue how to proceed (yet). Help...
Bill, I just found the site today and I'm loving it. Your instructions are very clear. I look forward to seeing the pinning info.
Just read all your scale making entries... love it. Love to read more.
Love to see Pinning 101, don't stop now!
Bill, Just found this, I would love to learn more, especially on the pinning! Thanks!
Hey Bill, I really enjoyed your scale making articles, and just wanted to give you a +1 for the pinning articles!
You have an excellent writing style and I have really enjoyed your work so far.
I'll be ordering your CD very soon!
Can you explain why one would choose to do a set of scales with a liner over a single piece scale? Are there any specific benefits, or is it mostly cosmetic?
Two materials? Well, one reason is that two materials can look good. Another reason is that the restorer may not have material long enough to make a set from a single piece... hence two separate materials.
Don't remember saying I'd choose a liner over single-piece scales. But if two materials are used, a liner is necessary.
Specific benefit? Prolly not...
Wonderful instructions Bill! I order the CD (should be here today) and I hope you go at least this in-depth on that - as well as the pinning and other things. Yes, please do a pinning series, maybe you'll add a thing or two in addition to the CD?
As far as machines go, do you have a best choice to recommend to us new scale makers? Sears is easily a choice for grinder/sander but is it the best value? Also, what type and brand of saw to use to cut? Just too many variables as well as salesman chit chat in wood craft stores to get it right.
Post a Comment
<< Home