OK, boys. Something brand new to you, but common practice for my shop. Before we travel there, let me say that the CD I prepared on straight razor restoration is packed full of information. The following post on this blog, however, is not part of it.
I have noticed over the years how the instruction that is found on my CD has reappeared on various forums using my information but offering different words to get there. Most contributors were very mindful of my copyrighted CD and kinda put helpful tips on the forums using their own take even though it was obvious to me where they learned what they were teaching. I never minded that too much because it was respectful.
On a seldom occasion, a few of the "newly self-appointed" instructors would take my info and pretend that it was theirs, and solely theirs and had been for their whole lives... That they learned it all by their little own selves. That got under my skin a bit, but that's a rant for another time. I did enjoy, and was impressed, by those that took my instruction and put it in a different light and a used a new and improved approach to get the same thing done. Because of a few of those offerings, I changed my own procedure for getting that same task done. I'm thankful for those guys because they offered genuine contributions to the restoration world.
Enough of that. Here we go...
Please please please, remember this!!!!!!!!!!!!!!!!!!! Anything that spins combined with the cutting edge of any straight razor is extremely "ouchy" if you don't pay attention to the very dangerous combination. Wear safety glasses and something to protect any part of your body that is made out of flesh. Unless of course, you just like to bleed... a lot! Eventually... you will have a mishap.
Every hobbyist has discovered sandpaper for restoration work. The trick is to use the least aggressive approach first. What I mean by that is to not start out using 100 grit sandpaper when you could very well get the job done with a 320 or 400 grit paper first. I hope you guys don't wind up hating me for holding back on the following instruction. I had reasons for excluding it from my CD, and, trust me, they were not selfish ones. However, I can see how some would disagree, so I'm just going to move on.
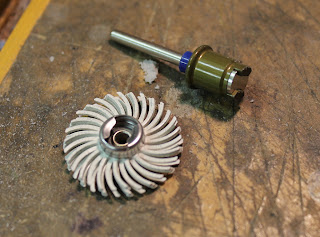
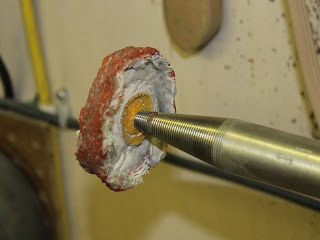
I just found these little dandies at my last excursion through Lowe's, my local hardware store. Lordy, you gotta get one of these, along with several wheels in the different grits. The yellow is 80 grit and the white is 120 grit. The grits are misnomers. They are not the equivalent of the same respective sandpaper grits. In my CD, I tell you how much of a help these radial bristle discs work. Often, they are difficult to locate for those wanting to buy them. I know a couple places, but you have to have a business account with them to buy anything. They work like a champ around the pivot pin, the space between the scales on the dorsal and ventral side of the tang, and "spotting" rust on the blades.
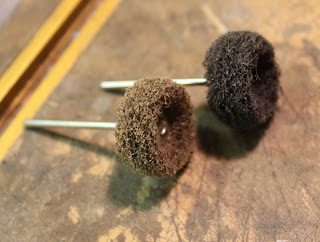
Another couple of extremely helpful gadgets are these little boogers. They are Scotch Bright wheels and come in different grits. If you don't have a buffer and are limited to small hand tools, these are the bomb! They work in just about any rotary tool. I use them in my Fordom and crank up the speed. It leaves a nice brushed finish on the blade after garnering a bit of practice with them. 10 times better than flap wheels, by the way.
If you have a buffer, preferably a buffer with a half-horse or bigger, you are gonna be amazed at the process I am going to share with you. Let me also say that the best choice for a buffer is one operating with 1725 RPM's. While higher speeds work well with Scotch Bright wheels and the larger Radial Bristle Discs, it's much better to have the lower speed for buffing the blade. I will add here that the "buffer" is the most dangerous tool in my shop.The first time a buffer snags a razor out of your hand and slings it willy nilly at supersonic speed past your crotch, you will get my drift.
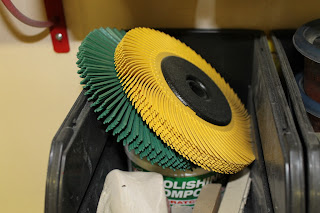
Anyway, if you can afford it, get a couple of these. They are about $40 to $50 apiece, but man, can they put the whiz with kid. If you can only afford one, get the white one, which is 120 grit. The green one can remove barnacles from the Titanic. The red one sees a lot of use in my shop. It's a good "final" treatment and is 220 grit. They are six inches in diameter and are extremely versatile. They last forever - almost. Make sure they face in the right direction when they spin. They should orient the opposite as a saw blade on a table saw.

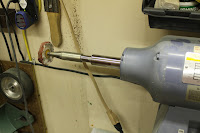
Now, for the best kept secret I have. The ticket! The bomb! The answer! The holy moly! The good-lookin-out! You pretty much have to have a buffer, preferably with a tapered spindle as seen in my photo to get the most out of this method. It also helps if you have a long-spindled buffer, but you could survive without it. If you used mine, though, you'd definitely buy one like it. You may be able to adapt this technique by using a grinder with the protective shrouds surrounding the wheel area removed, but I have not tried it. Yonyown (you are on your own.) with that one. You also may have another solution yourself besides buying a $500 buffer.
What you need,
and practically all you need for restoration, is a series of 3-inch diameter buffs. You can get them anywhere. The trick is what you put on them. Often, you will hear about polishing compounds on the chatter of the forums. Those are useful for just that - polishing. The ones I refer to are not polishing compounds - but rather - they are abrasive compounds. I get them in different grits. Most often they come in plastic-wrapped tubes that resemble the salami you'd get from the deli. I store them in air tight containers to keep them from becoming dried out. They can be rejuvenated by placing them in a shallow dish with a couple tablespoons of water.
 |
| 3" buff with abrasive compound |
Anyway... K&G knife supply has some
killer compound. It's brush-on and you have to let it dry before you use it. You will learn how much to apply with practice. The answer is to make sure it is dry dry dry. Have several buffs with the compound on them. You do not need a lot of this compound. This is where, by the way, a tapered spindle is almost a must. I change wheels in about 10 seconds. One treated wheel is enough to do maybe 3 razors before the buff needs a new coat of compound. Do not be alarmed at the sparks that fly. That's how you can tell how good it's working.
If this has been helpful, post something here so I know.
 |
| salami tube compound showing |
Labels: Blade finishing