Making Scales 101

DISCLAIMER!! Your injuries are your own, not mine. Accidents happen. Be mindful of what you are doing and they will happen less often. I am assuming it is a given that I wouldn't have to warn you about getting your fingers in front of a moving band saw blade. This is how the work is done, not a safety course.
OK, Guys... please be mindful of my copyright material. I don't mind if you print this instruction out for yourself. But I do not want any of this information to be used in any publications or other web sites without my permission.
The material picked for this set of scales is oosik. You may have run across it in the restoration section called New Hybrid with Oosik Scales. This is a different piece, and don't know myself how good this set will come out. I am taking pics as I go. For those who don't know, oosik is the bone from the penis of a walrus that has been dead so long, the material has fossilized. Not petrified... fossilized. It has been one of my favorite materials for handles/scales on my knives.
The procedure for making scales is basically the same, no matter what material you decide to use. Knowing how to make a set with liners will enable you to pop out those single piece scales with ease.
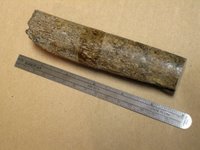
Oosik comes in different colors and sometimes in lengths of two feet. How cool is that? White to brown and sometimes with other colors in the bark generated by minerals in the soil where the creature came to his final resting place. The bark is the outermost section. Here is the piece we will be working with.
Okeedoke. Draw a line down the center of the material with a sharpie. If you need instructions on how to find the center, you may want to skip the rest of these instructions. I am going to assume that those interested in making scales have a basic understanding of working with common tools. Please don't take it as an insult if you are the one who needs to skip the rest of the instructions. I just won't have time to explain every little detail. I did not measure mine... I just eyeballed it. I have always adopted the premise that if it looked good, it was good.
If you do that, you sometimes pay the price. It turned out that I was off by a 32nd of an inch after making the third set of scales from this material and I will be lucky if I am able to use the best part of the bone, which is the outer bark. The reason I say better is because that is usually where all the color and character of the boner is seen. I happen to like the inner section where all the blood vessels were just as much because I can use different color epoxies to fill in the spaces.
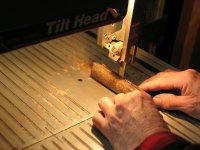
Make the cut down the center of the sharpie line you drew on the bone on your band saw. No band saw? Bummer. But you can still do this. My next choice would be a scroll saw. Those are only about a $100, sometimes less. Try, though, to get access to the band saw. It makes this part a piece of cake. I know I don't have to tell you to be careful. Cut slowly, and watch out for your thumbs. I do this free hand. If you want to figure out a taper jig or use a rip fence, that's ok too.

Here we are about half of the way through. If you are not wearing a mask by now, I'm thinkin' that you wished you had. The worst case of flatulence has nothing on this stuff when it is cut or being ground down.
Once you get all of the way through, it will look like this.

To get the most out of this material, you are going to need at least 1/8 of an inch thickness for each set of scales. Set your rip fence on your band saw to that thickness. Before you go to slicing any more, however, you need to sand both halves of your material flat. Notice I said flat. It does not have to be smooth. Wear a dust mask at the very least. A cartridge type of respirator is much better if you have one.
I made up a horizontal 9 inch sanding disc specifically for this type of sanding because I do a lot of it. You can accomplish the same thing with a vertical one that has at least a 6 inch disc. There are combination belt/disc sanders at, where else, Sears. That tool will also be in the photos here pretty soon. Here is the horizontal one.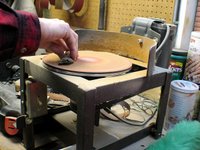
This concludes Making Razor Scales 101... to be continued with 102.
Are you learning anything?
posted by Bill at 10:19 PM
![]()
![]()


3 Comments:
Love that turntable sander.... now just where did I put my old record player?!?!
Regards
Christian
Bill, this is great stuff. I've been messing about making scales from Lexan and plexi, and holding off on wood for the fragility. I never though to line them - brilliant.
Keep it coming, sir - I eagerly await the new CD, too.
not only is this man showing us in laymen terms,even i can follow,,hes also got a good sense of humour,,love it
Post a Comment
<< Home